Web Chat Setup

Introducing the Mava web chat

The Mava web chat allows your users to easily seek help, right from your website. The Mava web chat can be added to any website with one line of code.

If you want to see the Mava web chat in action, head over to our website at Mava.app and say hi 👋

Why add a web chat to your site?

  • Improve your customer experience and conversion rates by making it simple for your users to seek help right from your site

  • Match your brand identity with custom icons and colors

  • Reduce resolution time by automatically gathering user details such as:

    • Which web page they opened the ticket on

    • Device and browser type

    • Location

    • Email address

    • Wallet address (if connected to dApp)

  • Offer 24/7 support with Mava AI

  • Automatic email follow up if a user leaves your site

  • Simple integration, insert one line of code into your website

  • Spam protection (coming soon)

How to customize the web chat & add it to your website

Customization and setup can be done in under 10 minutes.

You must be a team admin to access integration settings.

Step 1: Create a new integration

  • Within the Mava Dashboard go to the integrations page

  • Create a new 'website chat' integration

Step 2: Preview your website

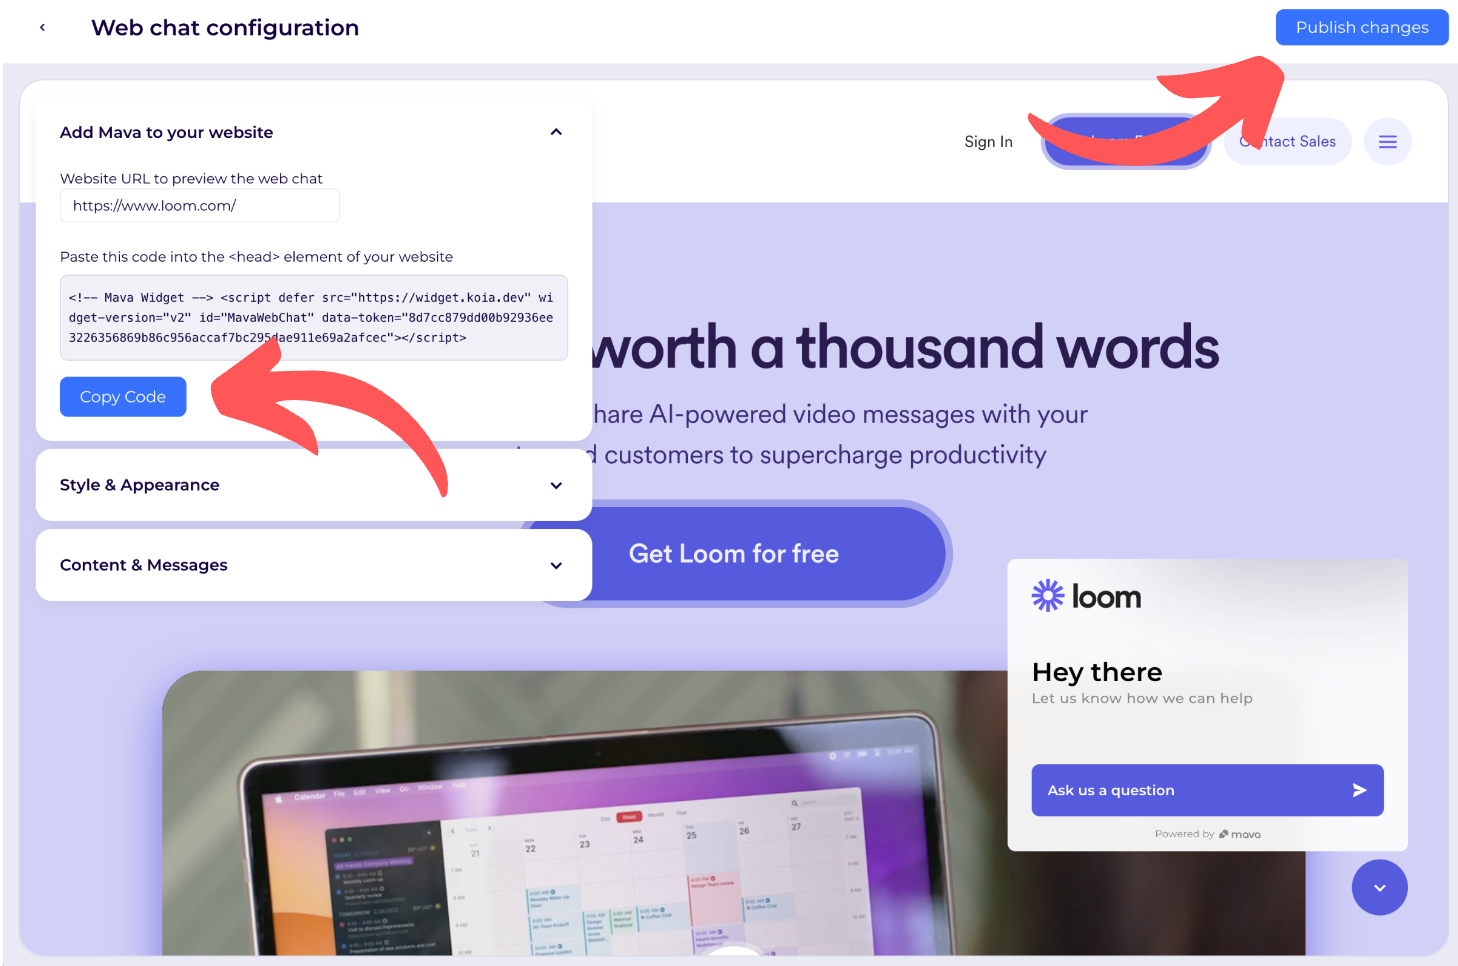
  • Paste your website URL into the first box to preview your site (some sites might not show a preview, but don't worry the web chat will still work)

Step 3: Customize the web chat design

Mava offers a range of customization options:

  • Theme - Light or dark theme

  • Action color -this will be used across all buttons and be used as the accent color

  • Background fade color - this will apply a subtle gradient to the top of the web chat to help it match your brand identify

  • Logo - you can add your company’s logo. Rectangular logos with a transparent background work best, but you can also upload a square logo if you prefer.

Here’s and example using Loom’s branding to give you an idea of how it can look:

Step 4: Require a user's email address before opening a ticket option

Within the content & messages section you have the option of requesting an email address before users can open a ticket.

If you collect a user's email address before they open a web chat ticket, users will be able to leave your website and receive your replies via email. This ensures they never miss your reply.

If this setting is turned on, users won't be able to skip it or create a web chat ticket, without leaving an email address.

Here's what it would look like for your users, using the Loom branding example:

Step 5: Edit welcome message and button text

Within the content & messages section you can update the welcome message and change the text on the primary button.

Step 6: Add Mava to your website

  • When you’re done, press the Publish Changes button to save your customization

  • Next, press the Copy Code button

  • Paste the copied code onto your website after the opening <head> on each page you want the web chat to appear

Editing the Mava web chat after it's live on your website

Simply return to the integrations page within Mava settings and make the changes. When you're happy press the 'Publish changes' button on the top right and the changes will be instantly live on your website.

Last updated